Managing Multiple AEDs
Topics
- Information for Registering
- Registering AEDs with Import
- Sorting and Searching for AEDs
- Updating Information for Multiple AEDs
The AEDs page can be accessed via the horizontal navigation bar or the vertical navigation bar on the left side. Use this page to register AEDS, and update information on expiration dates and monthly inspections.
Information for Registering
There are two ways to register AEDs: individually or by importing the information from an excel spreadsheet. When adding AEDs it helps to have a few facts at hand before beginning the process. You will need:
- AED Information
- Location
- Manufacturer
- Model Type
- Exact Location
- Purchase Date
- Serial Number
- AED Battery Information
- Purchase Date
- Insert Date
- Expiration Date
- Spare Battery Expiration Date
- Electrode Expiration/Use by Dates for:
- Adult Electrode
- Spare Electrode
- Pediatric Electrode
Registering AEDs with Import

- Select Import AEDs and Download the Template.
- Enter information in the correct columns. Use the reference tables on the right of the import page to help enter the data. The data in the table must appear as seen in the reference tables. Do not alter the information.
- Save the template as a CSV file.
- Select Browse Computer on the Upload AED page and find the template. Upload.
- You should receive a message that you have successfully emailed the AED template to Cardiac Life. The process will be completed by Cardiac Life Products.
Sorting and Searching for AEDs
There are several ways to sort and search AEDs.
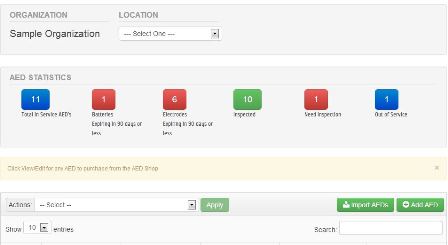
- Use the drop down menu in the organization box at the top, to sort AEDs by location. Select a location to view AEDs at that location.
- Use the tabs in the AED statistics box to sort AEDs by statistical property. You can easily view the AEDs that need maintenance by choosing to display “Batteries Expiring in 90 days”, “Electrodes expiring in 90 days”, and “Need inspection/verification”.
- On the right hand side, under the Add AED tab, you can search for an individual AED by manufacturer, model, location, exact location, or serial number. As you type, the information will be sorted.
- To view all AEDs after sorting, click on the Total in Service AEDs tab in the Statistics box or select the organization name from the locations drop down menu.
- To view the information on an individual AED, click the View/Edit tab for the particular AED. In View/Edit you can edit, delete, or inspect the individual AED. You can also remove a unit from service.
- You can also sort the AED list numerically or alphabetically by each of the category headings above the individual AEDs. Click on the arrows to change the sorting feature.
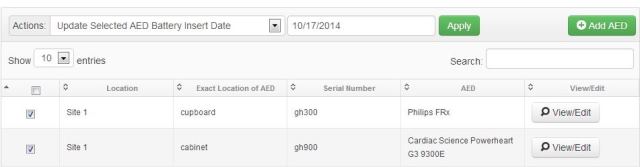
Updating Information for Multiple AEDs
Bulk actions allow organizations with many AEDs to record routine maintenance information for multiple AEDs in one action. From the AED home page select the AEDs to inspect or update. You can click anywhere in the line that contains the AED. The small square to the far left should now be checked. Once the AEDs are selected:
- Select “Inspect selected AEDs” from the actions box above the AED list. Apply and a new window will pop up. You may add notes in the box next to the AED serial number and Inspect with Notes. If you do not want to add notes, Skip Notes. Either action should return you to the AED page where you will see a message, “You have successfully inspected the (chosen number) AEDs”.
- Select “Update selected AED battery insert date” from the actions box above the AED list. A “select a date” box will appear next to the actions box. Choose the insert date for the battery. Apply and you will see the message, “You have successfully updated the battery insert date of (chosen number) AEDs”. For certain batteries this will also update the expiration date.
- Select “Update selected AED battery expiration date.” from the actions box above the AED list. A “select a date” box will appear next to the actions box. Choose the expiration date for the battery. Apply and you will see the message, “You have successfully updated the battery expiration date of (chosen number) AEDs”. The same process is used to update the spare battery expiration date.
- Select “Update selected AED adult electrode expiration date” from the actions box above the AED list. A “select a date” box will appear next to the actions box. Choose the expiration date for the adult electrode. Apply and you will see the message, “You have successfully updated the adult electrode expiration date of (chosen number) AEDs”. The same process is used to update pediatric or spare electrodes dates.