Managing Individual AEDs
Topics
- Information for Registering
- Registering AEDs Individually
- Sorting and Searching for AEDs
- Updating Information for an Individual AED
The AEDs page can be accessed via the horizontal navigation bar or the vertical navigation bar on the left side. Use this page to register AEDS, and update information on expiration dates and monthly inspections.
Information for Registering
There are two ways to register AEDs: individually or by importing the information from an excel spreadsheet. When adding AEDs it helps to have a few facts at hand before beginning the process. You will need:
- AED Information
- Location
- Manufacturer
- Model Type
- Exact Location
- Purchase Date
- Serial Number
- AED Battery Information
- Purchase Date
- Insert Date
- Expiration Date
- Spare Battery Expiration Date
- Electrode Expiration/Use by Dates for:
- Adult Electrode
- Spare Electrode
- Pediatric Electrode
Registering AEDs Individually

- Select Add AED from the right side.
- Select the AED site location from the drop down menu.
- Select the AED manufacturer from the drop down menu.
- Select the model type from the list of AEDs. A picture has been provided to help with selecting the correct model.
- Input the exact location of the AED you are registering. The exact location is where you keep the AED.
- Input the purchase date of the battery.
- Input the insert date of the battery. This is the date you put the battery in the unit.
- The expiration date will be auto generated for some models as this date is based on the insert date. For other models input the expiration date using the drop down menu calendar.
- Input the expiration date for the spare battery. Leave blank if you do not have a spare battery.
- Input the expiration/use by dates for each type of electrode. The information is found on the packaging. If you do not have a spare adult electrode, leave the box blank. If the electrode is a battery/electrode pack, be sure to enter the electrode expiration as the battery expiration date.
- The custom field tab can be used if you have more information you would like to track. For instance, if you would like to enter an asset tag or other identifier. Add Custom Field and enter your custom information. Submit Form.
- When the fields are complete, Add AED. The message "You have successfully added the AED”, will appear at the top.
Sorting and Searching for AEDs
There are several ways to sort and search AEDs.
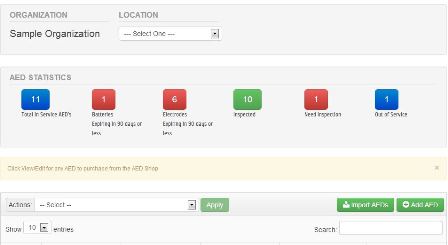
- Use the drop down menu in the organization box at the top to sort AEDs by location. Select a location to view AEDs at that location.
- Use the tabs in the AED statistics box to sort AEDs by statistical property. You can easily view the AEDs that need maintenance by choosing to display “Batteries Expiring in 90 days”, “Electrodes expiring in 90 days”, and “Need inspection/verification”.
- On the right hand side, under the Add AED tab, you can search for an individual AED by manufacturer, model, location, exact location, or serial number. As you type, the information will be sorted.
- To view all AEDs after sorting, click on the Total in Service AEDs tab in the Statistics box or select the organization name from the locations drop down menu.
- To view the information on an individual AED, click the View/Edit tab for the particular AED. In View/Edit you can edit, delete, or inspect the individual AED. You can also remove a unit from service.
- You can also sort the AED list numerically or alphabetically by each of the category headings above the individual AEDs. Click on the arrows to change the sorting feature.
Updating AED Information
Individual AED information can be accessed from View/Edit to the right of the AED you wish to update or inspect/verify. Search for the AED you wish to update and click on View/Edit:

- To inspect/verify an AED, scroll to the Inspect/Verify AED box at the bottom of the page and click on Inspect/Verify. A pop-up box will appear in which you can enter inspection notes if desired. Click OK to complete. The message, “You have successfully updated this AED”, will appear at the top.
- To update battery or electrode expiration dates, click on the corresponding text box and choose a new date from the calendar. Save to complete. The message, “You have successfully updated this AED”, will appear at the top.
- The AED status can be toggled between Active and Inactive by clicking on the box at the top of the AED information. Save to complete. The message, “You have successfully updated this AED”, will appear at the top.